Greetings everyone. I recently created a Linux bash script that will add a text based user interface to one of the oldest disk imaging tools out there. The idea behind this was I tend to fat finger a bit so instead of typing out all of the command I would rather have a script handle the command syntax for me and all I would have to do is enter a few bits of data. After that the script would handle the rest.
This script uses the dd command for imaging. First let’s start off with the normal way dd is used.
Before I use the dd command I check on which location in the file system the drive I want to image is located.This is the way the dd command is used on the command line.
Here’s the breakdown of the command:
sudo = this command provides the user with temporary root privileges
dd= the invocation of the dd command
if= This is the location of the disk that is to be imaged. In this case it’s /dev/sdb
of= the name of the output file. In this cases it’s image.dd
bs= this is the block size. DD takes data in chunks called blocks. The smaller the block the less errors you may have during imaging but it will take longer. The block size for this image is 2048K
Here’s the script in action.
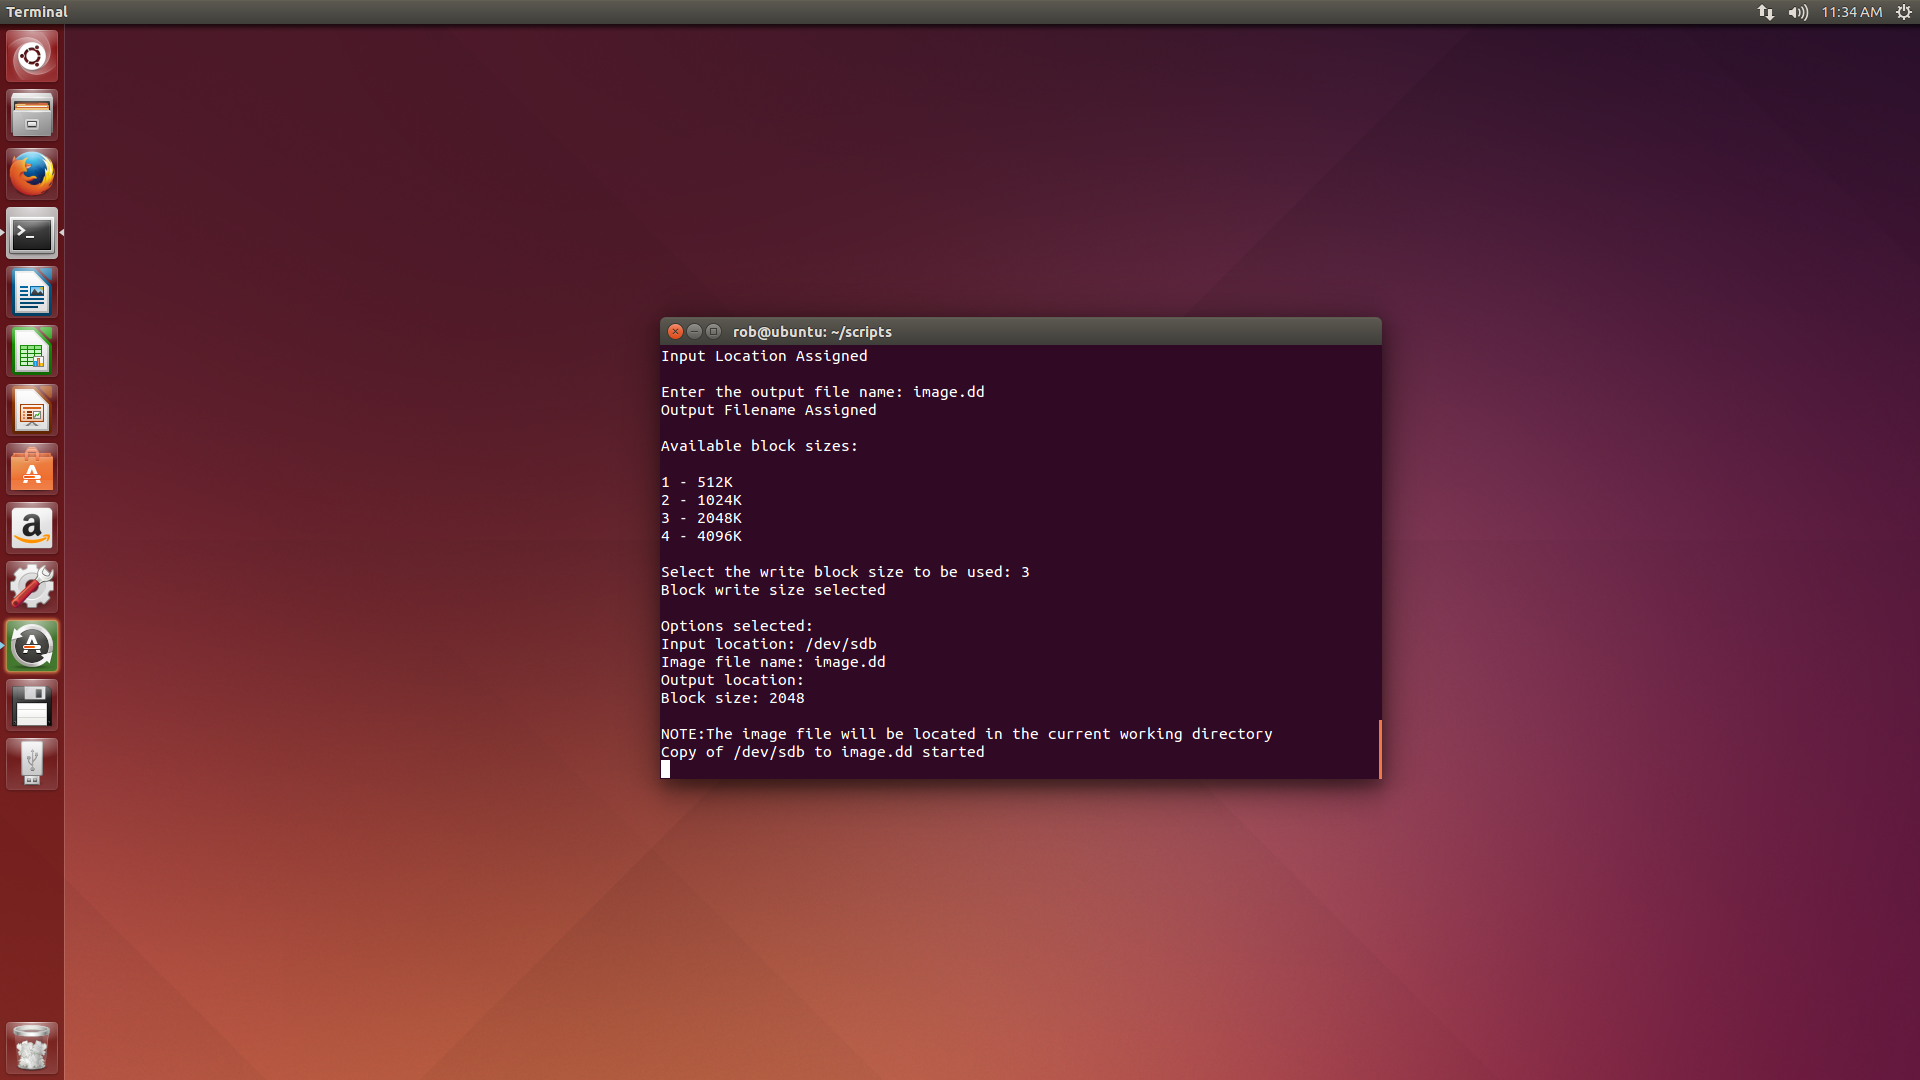
This is the invocation of the dd scriptNext the script will display a list of what devices are mounted to the OS The blkls command is used in the script to show this data. From this data a location of a mounted drive can be entered in.The script is then going to ask for a file name for the imageAfter the file name is entered the script is going to ask for a block size. All the user has to do is enter a number 1-4 and a corresponding block size is selectedNext the script will show what options the user selected and the imaging will begin. The script is still a work in progress. This is evident with the blank output in the current location field. The image is always located in the current working directory.
I plan on making tweaks and changes to this script. Once everything is done I’ll put the completed script in another post. Thanks for reading!
In computer programs sometimes you need something to happen if a condition is fulfilled. Other times if the condition is not fulfilled the program has to do something. In programming IF statements is one of the ways that is used to have a computer do multiple tasks based on a variable outcome. Here’s an example using a small bash script I wrote.
This script shows the user three options and prompts the user for a response. Either 1, 2, or 3.
If 1 is chosen then the computer will display the word “Yes”
If 2 is chosen the the word “No” will display.
If 3 is chosen then the program will quit.
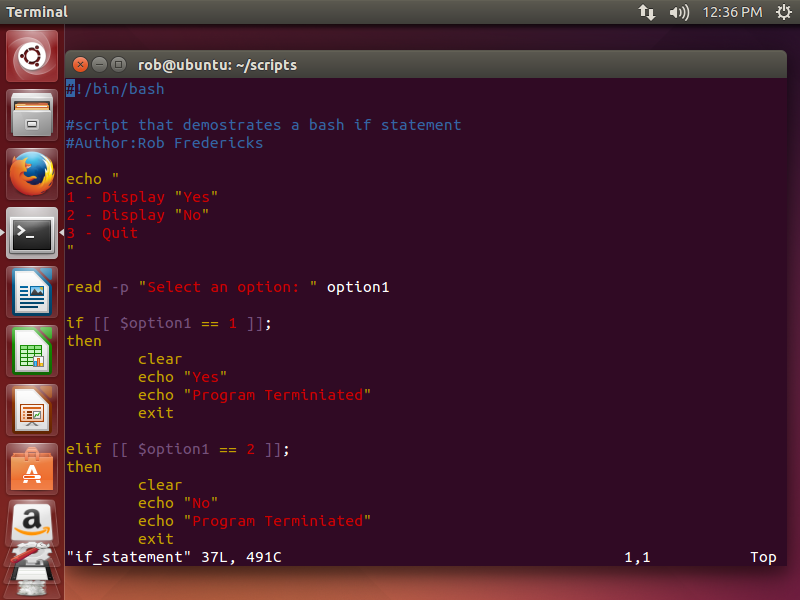
Here’s the first part of the script.Here’s the second part of the script.
Here’s the breakdown of the script:
shebang (#!/bin/bash)
This is telling the OS which programming language I’m using. In this case it’s the built in bash scripting language.
The text in blue is just comments for the programmers reference
I have the program echo or display the options to choose from to the user
The read command take user’s input and puts it into a variable. In this case the variable name is option1
Next are my IF statements. These statements use the option1 variable as a condition to check and see what code to execute. For example if the user selects 1 then the first IF statement will execute because option1 (which is the user’s choice) equals 1.
The IF statements require several things in order to work right:
The condition
Brackets to encase the condition [[ ]]
Spaces between the brackets and the conditional
A semicolon at the end of the brackets
A then statement
Code to execute if the condition is met
A fi statement to end the IF statement
You will notice that all of the IF statements in this script have all of these.
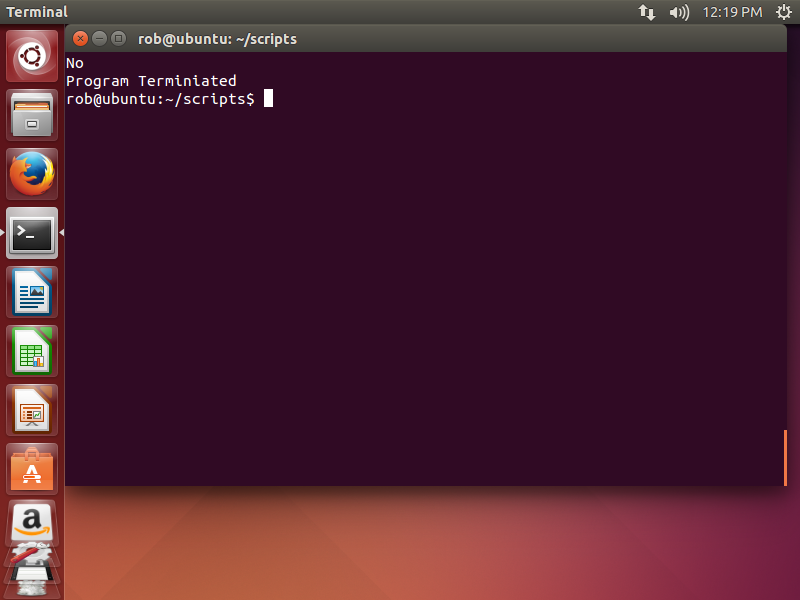
Here’s the script in action using all of the options available to choose from.
Depending on what option I give the program it will either display Yes, No, or quit the program with a termination message. This is the power of IF statements. A programmer can have the computer test a large amount of possible options all within one program. Great stuff!
Another option is to use ELIFs and the ELSE statement with the IF statement. With ELIF (Else If) I can combine multiple conditionals into one statement rather then using multiple IF statements. The ELSE statement will execute if the conditional for the IF statement is not met. To show this I’m going to modify the top script with ELIFs and an ELSE statement.
Not only did I modify the script but I’m also using a different text editor. The editor is called vim which stands for vi improved. Vi is included in every distro of Linux.Instead of having multiple separate IF statements I now only have one huge statement that houses all of the conditions I want the program to evaluate. If any text other the the numbers 1, 2, and 3 are chosen the program will quit with a termination message. I also modified the user prompt using the -p (prompt) option with the read command.
For more information on bash IF statements see: http://codewiki.wikidot.com/shell-script:if-else
Linux scripting or bash (bourne again shell) scripting is the technique of taking one or more commands in the Linux command line and placing them into a single text file to be executed. This technique can be used to automate command line functions and can also be used to run multiple commands using just a single typed command on the Linux command line. Linux scripts are just a series of Linux commands.
Here’s an example: say I want to display a multiple line welcome message while I’m in the command line. There are two ways (that I know of) to do this:
1- use the echo command to display the each line one at a time
You could use two lines to display a welcome message
2 – write a script that will display the entire message all at once
I used the nano text editor to write the script .The “#!/bin/bash is called a shebang. It is used to tell Linux what “interpreter” to use when going through the lines written in the script. In this case I’m using the built in bash scripting language so I have to tell Linux via the shebang that I’m using the bash scripting language otherwise the OS will not understand what I’m writing.
After I finished writing the script in order to use it I have to make it an executable program. I do this using the chmod command.
First is the command invocation”chmod” then “u” which stands for user the “+x” means that I’m giving executable permissions to the user. Then the last part is the file I’m changing permissions on which is “welcome”
After I set the permissions I run the script.
Instead of having to type two lines to display a welcome message I just had to type a single word and the script did everything else for me.
This is just a small taste of what scripting in Linux can do. Scripting can do mundane things like display text and also advanced OS commands like process management. Thanks for reading!
As hacking techniques evolve more and more, hacks are being done without the malicious programs touching the hard drive. All of these processes reside inside the memory of the victim computer. When this happens memory forensics becomes necessary. In this post I’m going to show a few of the volatility modules that can be used to find running processes, unknown network connections, and the DLLs associated with each process that are found inside of computer memory.
First I’m going to make sure I’m in the directory that has my memory images
I navigated to the directory where I have my memory images and I used the ls command to list them.
Once I know I have the right images to analyze I use the volatility framework to analyze the memory files. Volatility is a free open source suite of software that is used for advanced memory forensics. It is supported by the Volatility Foundation. The website for the volatility foundation can be found at: http://www.volatilityfoundation.org/
First I’m going to check for open network connections.
This is the command that is used to see the open network connections at the time the memory image was taken. The timeliner module is going to be usedI used the grep command to narrow down the results to just network connections that are active or “established”.
This is odd because this computer should not have any active network connections at all. So this is the first indication that something is wrong.
Next I dig a little deeper and I use volatility to display a list of all the running processes. The pslist module is used to do this.
The command for viewing the running processesNotice that you see an FTKimager.exe process. This is the imaging software that I used to capture the memory image
In windows each executable (.exe) has dynamic link libraries (DLLs) associated with it. These are located inside of the .exe file. Volatility can be used to see each DLL that is inside of an executable. The dlllist module is used for this task.
The command to get the DLLs from the executables.The dlllist module lists all of the DLLs associated with the EXEs. The module also lists the command line syntax that is used to run each executable. The process ID for each EXE is also listed.
I found an interest DLL in one of the executables. I decided to Google it to see if it was something odd.
After searching Google for this I found out that this DLL is the Microsoft Visual C Run Time Library. It is a normal process that runs in Windows.
This is a small taste of what memory forensics is. It is a growing field and the more complex hacking attacks get the more rouge processes may be located in memory. Thanks for reading!
With computing many programs and processes run in the background. Unless you’re a savvy computer user you may not be aware of these processes. Hackers sometimes use these processes to hide themselves inside victim computers.
In this post I’ll be using two of my virtual machines to demonstrate how a hack happens, one way a hacker can hide in a system, and how it can be found on the victim.
NOTE: These two machines are both under a host only network. Meaning that the hacking attempts shown in this demo cannot get out into the open internet. Even though this demo involves hacking I do not in any way support the illegal hacking of any computing device.
First I start off with setting my two virtual machines in a host only network sand boxed within my host system.
I had to make sure on both machine that they were set on VMnet1. This Virtual network is configured as host only so any communications that happen between these two machines will not get out into the open internet. Therefore I can safely hack the victim.
After confirming that the two VMs are configured correctly I boot them and disabled any firewalls, AV software, and other programs that would detect the hack on the victim. The purpose of this test is not to bypass all of these programs but to get a piece of malicious software on the machine and to show some ways that it can be found.
After the two computers are connected I had the VMs ping each other to make sure they can communicate. After that I used zenmap on my hacking platform to scan for open ports on the victim VM.
This program sends network packets to ports on the target computer and returns data based on if the ports are open or not. “Open” ports are gateways into other computer. These ports are listening for a connection from another computer.
I already know which attack vector I want to use on the victim. It requires port 445 to be open. After checking the Zenmap report I found that port 445 is open. From there I start Metasploit and configure it to attack the victim.
Before hacking the victim I start a calculator on the victim and ran the tasklist command in the command line. What this command does is it shows all of the currently running processes on the computer and how much memory each process is using.
Notice how much memory the calc.exe (the calculator) is using: 9,752 KB
After the configuring of Metasploit is finished I ran the exploit with the meterpreter payload. What this does is it gives me a shell (a text user interface) to interact with the victim computer. Using this shell I can gather information on the victim computer. Examples are password hashes, OS version, user account names, and processes that are running on the victim.
This shows that Metaspolit was successful in exploiting or hacking the target.
Right know the rouge program should be sitting in memory. This can be found pretty easily by a savvy system administrator. Next I take the rouge process and hide it in a process that is running on the victim.
On the hacking platform I used Meterpreter to hide the rouge program inside of the calculator that is currently running on the victim. After the migration I ran tasklist on the victim to see how much memory the calc.exe process was using. It shot up by 3,816K. This was because extra memory was need to accommodate the malicious code.
If the system admin knows roughly how much memory each process is taking when they run then this should raise a red flag. This is one way that can be used to see if a computer has been compromised. But more evidence is needed in order to make a clear determination if the computer was hacked.
Now that I know something is amiss I check which connections are currently open or “Established”. I used the netstat command on the command line to do this.
I used the -n, -a, and -o options with netstat. The -n option displays active TCP connections. The -a option shows all active TCP and UDP connections. The -o option displays active connections and show the process ID for each connection. I filtered netstat’s output through the find command. I was only looking for “EST” or established connections. From here I found one connection that is strange. I should not have a connection with a computer with this IP address. Again this requires further investigation. Know thy system. The only way to know if you’re compromised is to know what processes and network connections that are supposed to be running on your system.
After I found the strange connection I decided to check the event logs. First I checked the security logs.
I found a special logon in the logs. (Event # 4672). This should not have happened. So far it’s shaping up that this computer has been compromised. Note the time it happened. This is the exact time when the hack hit the victim computer. This time is in system time by the way. Unless you’re viewing the logs on another computer across time zones, then the times would adjust to your local time. This event happened on 2/3/15 5:17:06 PM system time.
After finding that event in the security logs I check the system logs to see if anything was installed on the computer. I use the time of the first event to search the system logs.
I made a discovery that a service was installed on the system 2/3/15 at 5:17:07 PM only one second after the unauthorized log on. Upon futhur examination of the log entry I found that the name of the service is a random character string. This is very odd. From this point I would say that this computer is compromised and steps would have to be taken to isolate this machine and eliminate the infection.
In this demo I have used the netstat command on the command line, memory usage of running processes, and the security and system event logs to discover that something odd was happening on this system. These are just a few of the ways that can be used to find out if a computer was compromised. The most important fact to note is that you have to know what is running on your system. If you don’t then you not have a reference to find out if something is wrong. I hope you enjoyed this post. For the next post I’ll be running memory analysis to show what processes are running on a computer. Thanks for reading!
Back in the late 1960s the US department of defense was designing the predecessor of what we now know as the internet. This network was called ARPANET (Advanced Research Project Agency Network). This network was one of the first that was designed to use packet switching, one of the concepts that is the backbone of how the modern internet works. But how does all of the network stuff work? One of the ways that the communication between computers can be explained and shown is through networking models. There are several examples of networking models: the OSI model and the TCP/IP model are two examples.
The main purpose of networking models is to standardize communication methods between two or more computer systems and to show what happens to data as it is transmitted from one computer to another. For the purposes of this blog post I’ll be focusing on showing the OSI networking model.
The OSI model was created by the International Organization of Standardization and the International Telegraph and Telephone Consultative Committee. These two organizations started working on their own separate projects involving networking back in the late 1970s. Eventually they combined their efforts and created the OSI networking model.
For more information on the history of the OSI model visit:
The OSI model contains 7 layers, these 7 layers split up the communication and protocols that are used between one or more network devices. Protocols are a set of rules that govern how computers exchange information. Certain protocols only operate on certain layers of the OSI model. I will discuss the functions of specific protocols in a future post. What’s important here is to know where protocols stand in relation to the OSI model. The protocols that are listed in each layer may not be the only protocols that operate at that layer.
The seven layers are as follows:
Layer 7 – Application
This layer is at the top of the OSI model
The application layer is the layer that is the closest to the end user
The application layer generates data that is to be sent across the network
Protocols that operate in this layer: HTTP, FTP, and SSH
Layer 6 – Presentation
The presentation layer is responsible for formatting, encoding, and decoding the data that is received on the network
Protocols that operate at this layer: MIME and ASE
Character encoding also takes place at this layer. For example UTF-8 encoding
Layer 5 – Session
This layer creates and terminates application sessions or connections
Protocols that operate at this layer: NetBIOS, L2TP, and PPTP
Layer 4 – Transport
The transport layer is responsible for reliable delivery of information
Protocols that operate at this layer: TCP, UDP, and SCTP
Layer 3 – Network
The network layer sends packets (chunks of data) between computer networks
Protocols that operate at this layer: IP, ICMP, and IPX
Layer 2 – Data Link
This layer sends packets across a single network hop (a single network segment), computer to computer, or from computer to a router.
Protocols that operate at this layer: ARP, SLIP, and ATM
Layer 1 – Physical
This is the bottom of the OSI model
The physical layer is comprised of the physical devices that send the data (wires, radio transmitters, etc)
Protocols that operate at this layer: Ethernet and WiFi
When data is sent from from one computer to another it travels along the layers of the OSI model. For example say there are two computers that want to exchange data: computer A and computer B. When computer A sends a message to computer B the message starts at the application layer then travels down the OSI model. When the message travels between layers it is encapsulated. I like to think of encapsulation like the message is being placed inside of an envelop. When the data from computer A reaches the transport layer it is encapsulated into a network packet. Technically a piece of information called a header is attached to the data sent from computer A. This header contains the sending IP address and the destination IP address for the message. When the packet reaches layer two another header is added to the message. This header contains the physical address or MAC (Media Access Control) address of the destination computer. Further more the message is encapsulated or wrapped into a frame. When the message reaches layer 1 it is broken down into bits (1s and 0s) then sent across the physical wires or wireless signals.
After the data is sent across the wire or wireless it is reconstructed into the original layer 2 frame. Then as it travels up the OSI model it is encapsulated again but in reverse order. As the data is encapsulated the headers are read and stripped off until only the data that is to be sent to the destination remains. These headers that were added by the sending computer tell the routers and switches where the message is going. Without these headers the message would not get to its intended destination.
This explanation is an overview of the OSI model and how two computers communicate with each other.
For more information on the OSI model and other computing concepts please visit:
Today computers come with large hard drives. Some can be 1 terabyte and other can be up to 4 terabytes (a terabyte is 1000 Gigabytes.) If a computer is purchased and the specs say that it has a 30 GB hard drive chances are that that actual useable space is smaller than that. Say around 27 GB, but when the user checks how much space is on the hard drive the OS will also say that it has 27 GB. This computer most likely has either a host protected area or a disk configuration overlay.
When a hard drive is made the vendor will set aside space at the end of the drive to be used as either a DCO (Disk configuration overlay) or HPA (Host protected area). This section of the hard drive is used to store data like system restoration files, or security software.
The concept of a disk configuration overlay was first seen in the ATA-4 standard and the host protected area was first seen in the ATA-6 standard. These concepts allow vendors to purchase hard drives of different sizes and essentially make them the same exact size so they can be used in their products.
The HPA and DCO cannot be accessed using normal commands or the operating system (the operating system does not see the HPA or DCO.) Some ATA commands are used to access these hidden areas. Examples of ATA commands are:
IDENTIFY DEVICE
Operating systems use this command to see what space on a hard drive can be used to store data.
SET MAX ADDRESS
This command can be used to create an HPA or DCO. As an example let’s say the maximum size of a hard drive is 1000GB. I use the SET MAX ADDRESS command to set the max address at 950GB. I just created an HPA; the last 50GB of the disk will not be seen by the OS since the max address according to the OS is 950GB.
READ NATIVE MAX ADDRESS
Certain pieces of hardware and firmware (i.e. the BIOS) use the READ NATIVE ADDRESS ATA command to see the true size of the hard drive. These devices are known as “HPA aware”
HPAs and DCOs have many uses some examples are:
Using an HPA to set a large hard drive to a smaller size so that older BIOS and boot loader programs can run.
The HPA can contain recovery programs or a preloaded OS set by the vendor
The HPA can also contain either root kits that are hiding or malicious code that can avoid detection by residing in the HPA.
For more information on HPAs and DCOs check the Wikipedia article at:
Greetings everyone, in this post I’ll be discussing the facts and importance of hashing. Hashing is the process of changing a string of characters into a fixed length value. This process is useful for digital forensics as well as for storing passwords on computer systems. When a user account is created on a computer system the operating system does not store the clear text password (i.e. not the password the user typed in. For example if a user set password as his password the operating system does not store the word “password”). Instead the operating system takes the typed in password and hashes it using a hashing algorithm. After the clear text password is put through the hashing algorithm a hash is produced. This hash is stored by the operating system. When the user attempts to log into the system the password the user types in is hashed then the hash of the typed in password is compared to the stored password hash that was made when the account was created. If the hashes match then the user is granted access.
Hashing is also used in digital forensics, when evidence is taken a copy of the original evidence is generated for examination. This “working” copy must be exactly the same as the original. The way to confirm if this is true is to use hashing. First the original evidence is hashed then the copy is hashed. If the hashes match then they are exactly the same bit for bit. With hashing when a file is even slightly changed the resulting hash will be radically different than before. (I will show this in the demo later in this post).
There are two main hashing algorithms being used in digital forensics:
MD5
SHA-256
The MD stands for message digest; this algorithm creates a 128 bit (16 byte) hash value when used. This value is sometimes shown as a 32 digit hexadecimal number.
SHA stands for secure hash algorithm; SHA-256 creates a 256 bit (32 byte) hash value. This value is sometimes shown as a 64 digit hexadecimal value.
For more information on MD5 and SHA-256 visit these pages:
These hashing algorithms are not reversible. Meaning if the hash is known it there is no way it can be changed back into the file it was computed from.
Using an Ubuntu linux system I will demo how the tools are used.
The tools that I will use are called md5sum and sha256sum. Both md5sum and sha256sum are included in the Linux coreutils program package and are usually installed by default.
First I create a test file.Next used the md5sum program to calculate the md5 hash of the test file. This is the digital fingerprint of the test file. The hash is also known as the checksum. The random string of numbers is the checksum of the test.txt file.Next I use the sha256sum program to calculate the SHA-256 hash of the test file. The output is pretty much the same as the md5sum program. The sha-256 checksum is longer than the md5 checksum.To show that the checksums will change if the file’s content is changed I’m going to slightly change the content of the test file. I used the nano text editor to do this. I changed the first letter in the test file from a capital t to a lowercase t.Lastly I take the hashes of both the original file and the altered file. Notice how both hashes changed. This shows that the file’s content has been changed. The blue rectangles are the original file’s hashes and the yellow rectangles are the altered file’s hashes.
Because the hashes change when the file’s content is changed this makes hashing incredibly useful if not vital to digital forensics. The original evidence as well as the evidence that is examined (the working copy) cannot change at all. If it does then the case can be thrown out. Hashing is used to make sure that changes do not happen to any of the evidence during the course of an investigation and a case. Thanks for reading.
I remember way back about 12 years ago I got my first computer. It was an HP Pavilion desktop. I stored my music on the machine and one day I accidently deleted one of my music tracks from the hard drive. At the time I didn’t have a CD of the track so it was lost for good it seemed.
Fast forward 12 years later, I still have the computer from 12 years ago and one day I decided to put my digital forensics knowledge to use. I removed the hard drive and imaged it. Using the imaging program I performed a triage on the hard drive and poked around to see what was on it. I was not surprised to see the music track that I thought 12 years ago was gone for good. During my forensics training I learned that deleted data may not be gone from the hard drive for good. So I used the imaging program to recover the data and all was well. So how do computers store data and why can the data still be there when it is deleted?
When a file is created on a hard drive the operating system needs to allocate space for that file. With NTFS (New Technology File System) formatted hard drives there are two ways that the operating system searches for unallocated space, I’ll describe one of them.
One of the ways Windows searches for unallocated space to allocate to a file is it will comb the hard drive and the first set of unallocated space that it finds that is big enough to accommodate the size of the file will be allocated to the file. Then the file’s data will be placed into that space. Here’s an analogy:
A family of three enters a theater and they need to find three seats to accommodate them. So they search for the first three seats that are next to each other and empty. The empty seats are the unallocated space, seats that are taken are allocated space and the family is data. When the family finds the seats they sit in them and seats are allocated to the family.
When a file is created and space is allocated to the file a file name is chosen by the user to identify that file. This file name is used by the operating system to find the file’s metadata entry. Metadata is data about data. An example of metadata is when you create a document in Microsoft Word usually the file has a creation time, modified time, author, and file size. This is the word document’s metadata. Once the metadata entry for the file is found the metadata entry points to the file’s content, the content is just the file’s actual data. So when you double click on a document to open it the operating system boots the program that will view the file then uses the file name to find the metadata entry then the metadata entry points to file’s content and the content is displayed in the viewer.
When a file is deleted from a computer is it truly gone for good? It depends. When a file is deleted from a computer (say by right clicking on the file and clicking delete) all the user is doing is telling the operating system to lose track of the file and unallocate the space that was given to that file. The file’s data is still there. It’s kind of like ripping out an index entry in a book, the index may be gone but the chapter is still there. The only time a file is truly deleted from a computer is if the space the deleted file is on is overwritten by another file or if a forensic cleaning program is used to wipe the unallocated space. Once a file is deleted even though the data is still there the operating system cannot recover the data on its own. Special programs need to be used to find the deleted data.
To show the concept of this I’ll do an experiment using one of my thumb drives.
First I have to create some test files.
After that I confirm with both the GUI and the command line that the three files are on the thumb drive.
Next I delete two of the test files.
Both the GUI and the command line show that two of the test files have been deleted. From here Windows on its own cannot recover the files even though they are still present on the hard drive. To show that the files are still there I’m going to use some forensic techniques.
First I image the thumb drive.
Next I import the image file into the Autopsy forensic browser and display the files that are contained within the image file.
The files with the red names are the files that I have deleted. The content is still there but the space that it is on has been unallocated so another file’s content can take up the space.
So with this still be careful when you go to delete something. Make sure you really want it gone. But at least there is still hope for getting the data back. Thanks for reading!
Greetings everyone. This post is going to be a mock digital forensics case and how I would go about answering the questions about an event that takes place on a computer system. First I’ll give you the case details:
XYZ corp has contacted me about an attempted cyber theft of sensitive company information. They believe that an administrator who works for the company is involved in the theft. They confiscated a personal USB drive that belonged to the employee in question. They believe this USB was used to steal the sensitive information. My job will be to confirm that the information is on the USB drive and that the USB was plugged into the work computer that contains the company’s information. I was told that the sensitive files are on his work computer and they have the words “secret” and “confidential” in their file names.
There are several questions I need to answer about the case:
Is the stolen data on the USB drive?
When was the data stolen?
When was the last time the USB drive was plugged into the computer?
What user account was logged into the computer at the time the data was stolen?
So the first step that I would take would be to take images of both the computer and the USB drive.
I used dd to take the image of the USB drive
Next I took a live image of the xyz computer.
I changed the power settings for both the machine being imaged and the forensic machine performing the imaging. I didn’t want either machine to go to sleep while the imaging was taking place.Here is the settings I used for taking the image of the xyz computer. I didn’t want to deal with a bunch of fragmented image files so I set the fragment size to zero.When the imaging finished FTK Imager automatically started to hash the image file and verify the hashes.Both the MD5 and SHA-1 hashes verified. Now I’m ready to prep both pieces of evidence for examination.
The images I took above are the “best” evidence. A best practice is to never examine the original or “best” evidence. So in order to get the image files over to my forensic system I have two choices:
Copy the image files over using a normal copy method like drag and drop
Take an image of the best evidence and use that image as the “working” evidence or the evidence to be examined
I chose option two because with taking an image I’ll know for sure that the copies will be exactly the same bit for bit. With the drag and drop copy I won’t be sure if the operating system will make changes to the evidence.
So I took my forensic hard drive that contained the original evidence and mounted it to my forensic system. Then I rehashed the xyz computer image and took an image of the best evidence using the dcfldd tool.Next I took a second image of the USB drive to use as the “working” evidence”After both working copies were made I hashed both of them and compared them to the original evidence.
With both working copies made and the hashes checking out I move on to the examination of both pieces of evidence. The first question I want to answer is if the stolen data is on the USB drive. I have two ways of confirming this:
Mount the drive to the forensic system and see if the data is on the drive
Use the Autopsy forensic browser and run a keyword search
I decided to use Autopsy to run a Keyword search. Because I know that either the words “Confidential” or “Secret” is in the file names. I ran a search for both of these keywords.
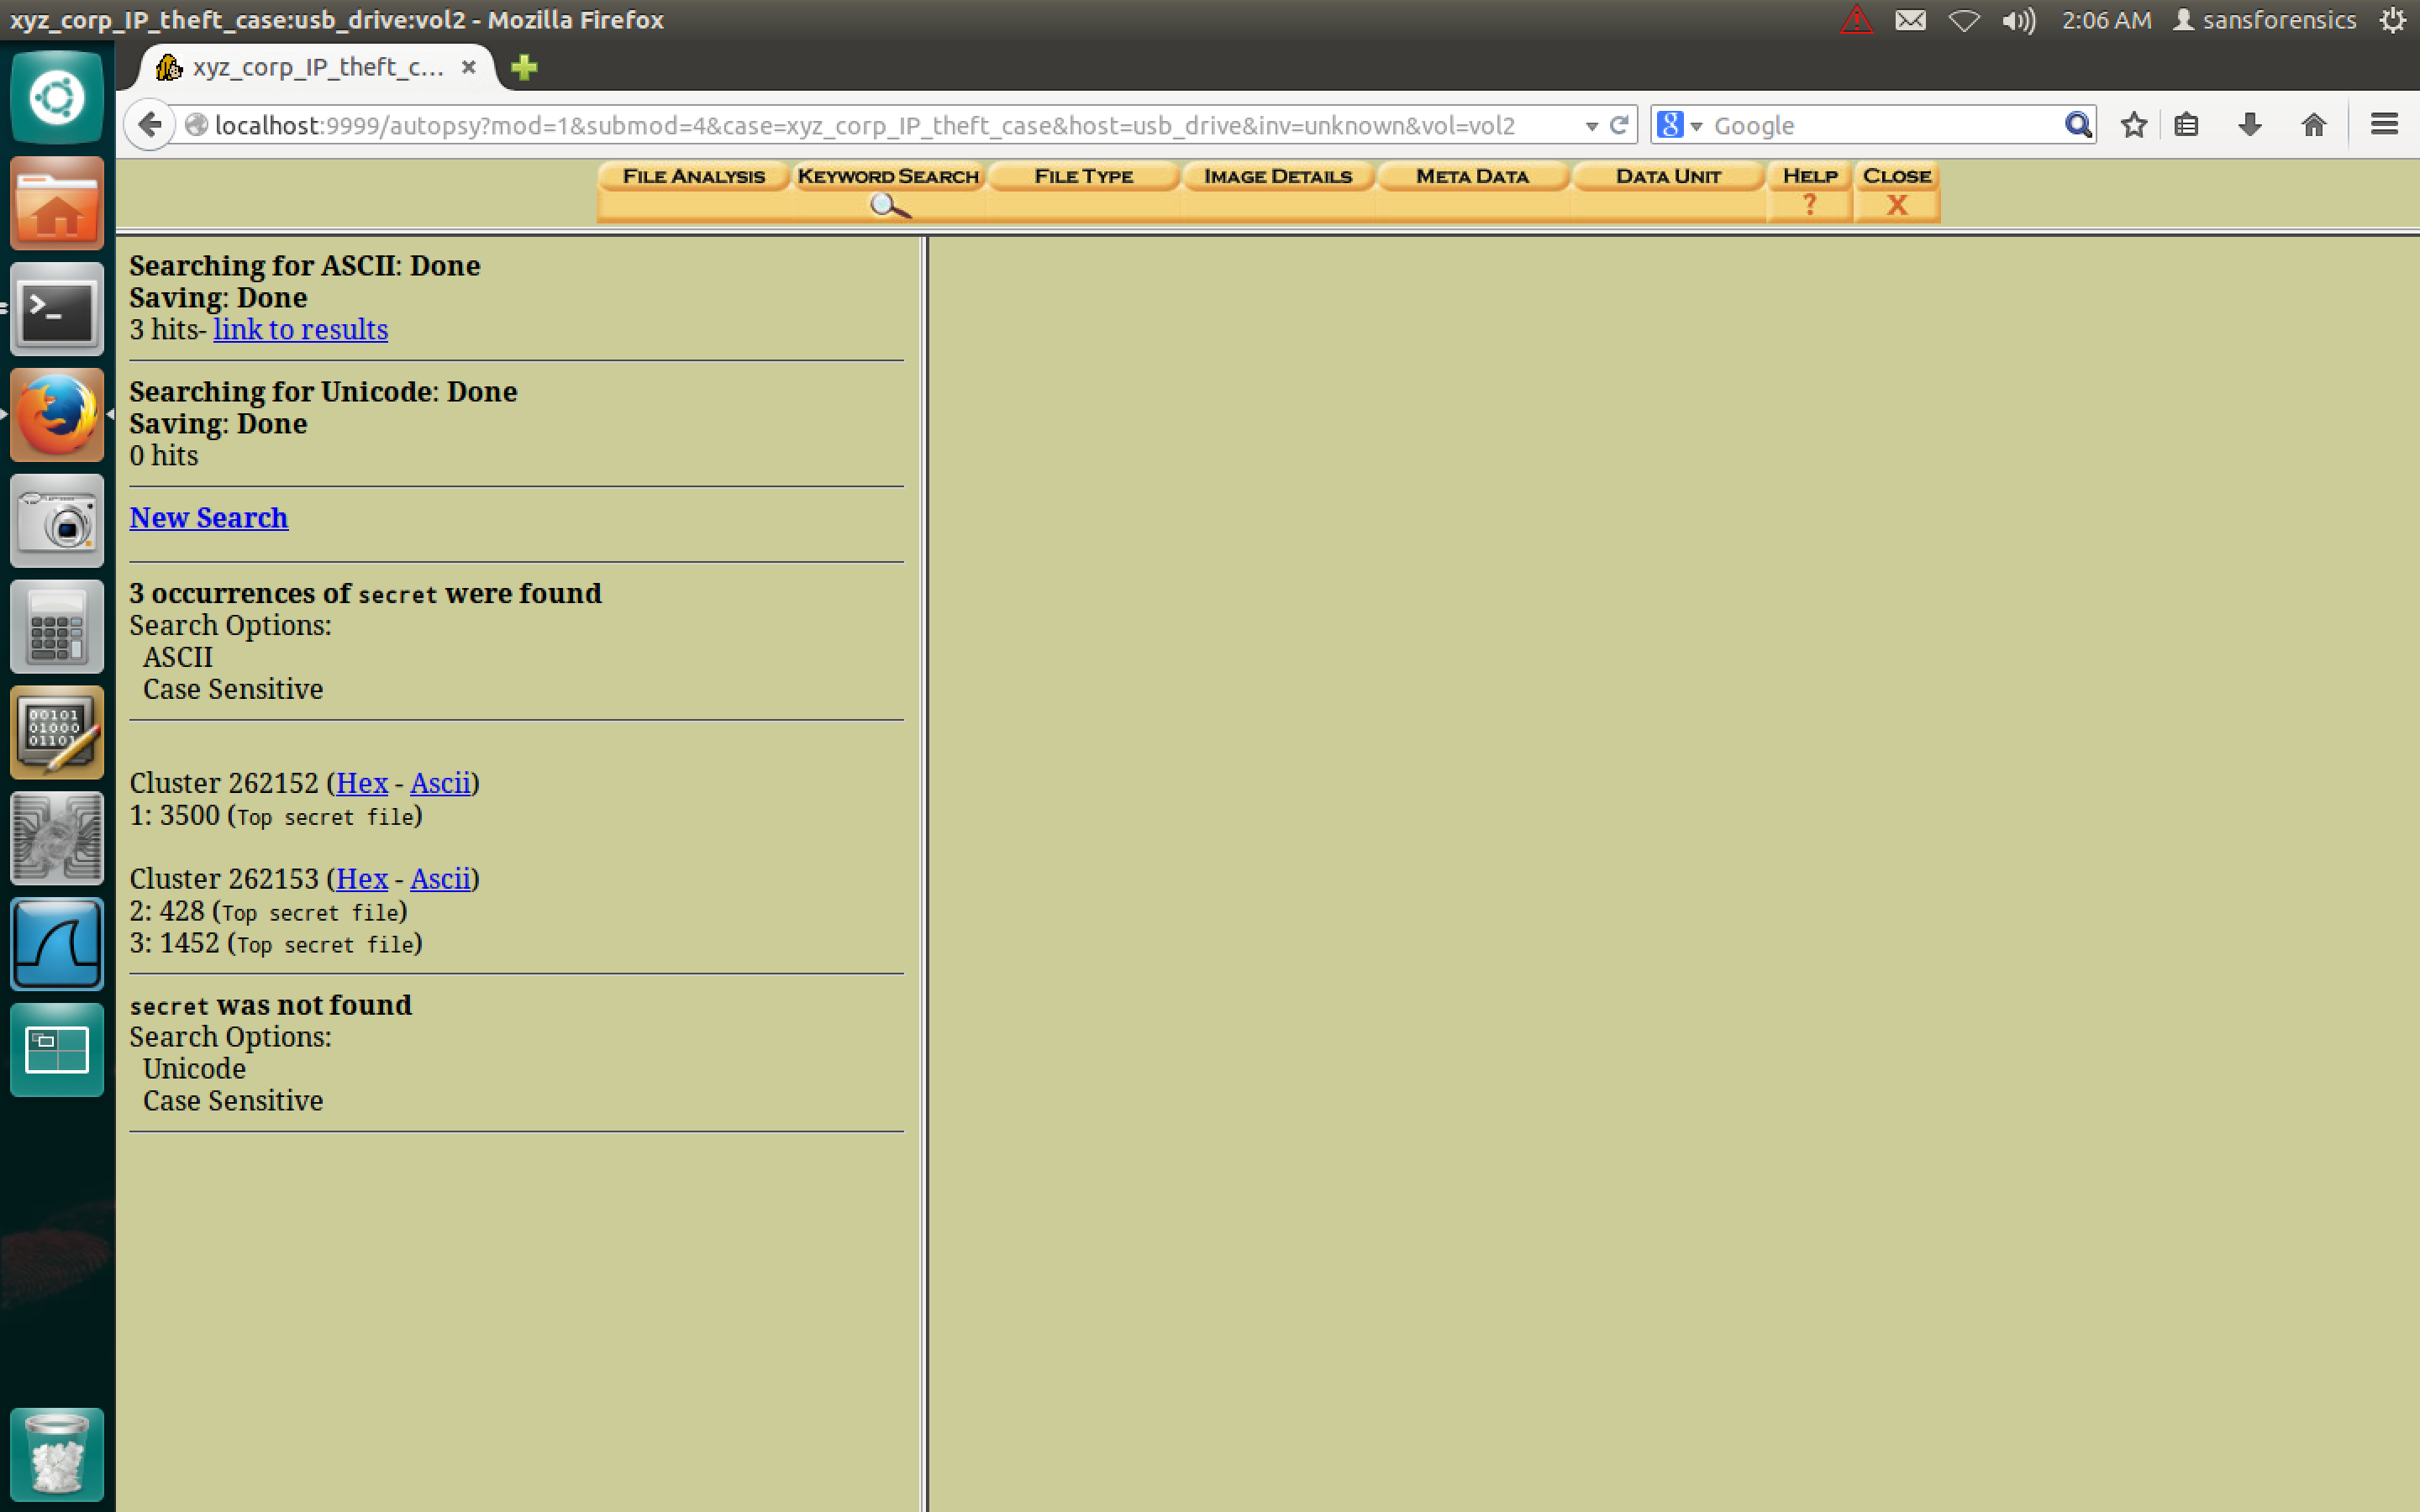
Searching the USB for the word “confidential” on the USB driveSearch results for the keyword “Confidential” on the USB driveSearch results of Autopsy looking for the keyword “Secret” on the USB drive
So far these search results tell me that four hits were found for “confidential” and 3 hits were found for “secret”. This is a good indication that the stolen files are on the USB drive.
I did not want to base the answer to the question on the keyword search results alone so I used Autopsy to perform file analysis on the USB drive’s contents. This option will give me a list of what files are on the drive, if they are deleted or not, the file’s timestamps, and which metadata entry points to the file.
All of the stolen files are found.
With this the first question of the case is answered. The stolen files are on the USB drive. There is something odd with the timestamps however. The time values in the yellow box are the written timestamps and the time values in the red box and the created timestamps. Under normal circumstances the creation time would be before the written time. But this clearly says the the last written time is before the created time. This is a clear indication that the files that were stolen were created on a different machine and moved to the USB drive. So the created time values are the times when the file’s were created on the USB drive. So each file’s creation time is when the file was stolen. This answers the second question.
Confidential file # 1
Stolen on 11/30/2014 at 13:06:11 EST
Secret File 1
Stolen on 11/30/2014 at 12:41:43 EST
Secret File 2
Stolen on 11/30/2014 at 12:41:43 EST
Secret File 3
Stolen on 11/30/2014 at 12:41:43 EST
Now that I have some time values I can check the computer image and see who was logged in at the time the files were stolen. Also I will check when the USB drive was plugged into the computer. I mounted the computer image file to my forensics system and ran a program that extracts data from the Windows registry. The program is called regripper. The registry is a series of database files that contain configuration information for the operating system. With Windows the registry is split into five hives:
Sam
Security
System
Software
NTUSER.DAT
Each user account on a computer has an NTUSER.DAT registry hive that is associated with it. The hives that contain the information I need to learn about the USB drive are located in the Software, System, and NTUSER.DAT hives. I first decided to rip the information from the System hive.
I used the mmls, losetup command, and the mount command to mount the image file.I used regripper to rip the information from the system hive. From this information I found the last time the USB was plugged into the computer
So this answers the third question: The USB was last plugged into the computer on Dec 2, 2014 at 01:09:07 UTC. Registry times are in UTC time or Zulu time. Since this computer was located on the east coast the time (which is 5 hours behind zulu time) is Dec 1 2014 at 22:09:07 EST. This is the last time the USB drive was plugged into the computer. Next I ripped the Software and the NTUSER.DAT registry hives for more information about the USB drive itself. I was able to find out several things about the USB drive from these hives:
Serial number
USB Vendor
Vendor ID
Product ID
Last drive letter the USB drive was assigned
Volume GUID (Globally unique identifier)
The user account which was logged in when the USB was plugged in
Once I found out the volume GUID I used this information to find out which user account was logged on when the USB was plugged in.
Once I ripped the NTUSER.DAT hive I searched for the volume GUID. Since the GUID is found it confirms that the account associated with this NTUSER.DAT hive was logged in when the USB was plugged in.
Now the final question is answered. This NTUSER.DAT hive belongs to the Admin account on the computer in question, so the Admin account was logged in when the USB drive was plugged in.
After the examination I would report to my mock client that I found evidence that the Admin account was logged in when the USB drive in question was plugged into the computer. Also that the sensitive company information was found on the USB drive. There was no need to find out if his account was compromised due to the fact that the suspect was seen plugging in his personal USB drive into the computer at the time of the theft. So with this evidence xyz corp woud make a decision based on the facts.
In the world of information security any number of cyber crimes can be committed against a person or an organization. This is one example of what can happen to a company. With that said always be careful with what you put on the internet. Thanks for reading!
Teaching the computing world how to protect themselves against hackers.